ACA630 review - A600 Portable II
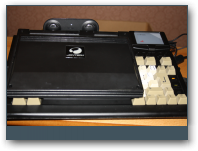
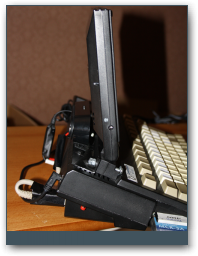
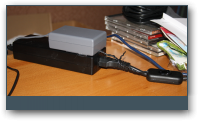
I did a major cleanup of the insides... the big change was removing the switched 12V car-adapter to the Joytech PS2 LCD screen, and instead using a 7.5V, 3A PS1 external PSU. Yes, another hole in the case, but fortunately I had already drilled one for my Dummy Switch (tm).
What? Dummy Switch? Well, when I first attached the PicoPSU the hole was for its 12V connector. But then I discovered it was a pretty stupid idea to make holes in the top half of the A600 case. At least if there's a cable going from that inside-connector to something in the lower half. It's very cumbersome to make something that is convenient to ever open again. Ever. Anyway, I put the PicoPSU hole beside the joystick connectors and I had a spare switch which I swiftly dubbed the Dummy Switch (tm). The idea was that it would LURE passers-by to switch it to see what happens, and they'd be so baffled at its inability to sabotage operations! Wah hah ha. Except only one person so far has asked about it :)
The good thing about the Dummy Switch Hole is that the screen power cable of course comes out of the top half of the case and so was perfectly suitable for super- and hot-gluing the power connector I had saved that I scavenged off the original Joytech "hinge half" that screws onto the back of the PS2 Slim.
Using the car adapter resulted in the "chained switched PSU" snow on the Joytech screen I had, and (once I'd snipped off the sound wires to, and unsoldered the speaker wires of, the Joytech LCD) a perfectly quiet screen with no interference noise. And also no excess heat generated inside the case from the 12V car adapter. Why be so heat-conscious? Well...
The other big change was the ACA630. ;) See my formal review / first impressions on English Amiga Board.
The installation of it was no problem, really. In my case I snipped off the plastic legs that rest on the HDD screwhole-solderpads, because I had been so smart as to use them to pull through thin wires from the underside of the motherboard, so as not to ever have to solder there again. Unsolder the "fastmem off" switch from the previous fastmem board, screw on the ACA630, and now it sits even more securely than the A6055 board that was there before. The switch now works as an ACA630 on/off switch, and I didn't have to use the ACA630 level 7 NMI-switch, as I already had one soldered to the motherboard and works fine in both modes.
I did some tests and there was no way I would have interference-free sound via the Joytech LCD. I'm not sure if something happened to it during modding, or if it always threw up on the line-out Amiga signal. But the speakers were wimpy anyway, so...
I instead used a short dual RCA to stereo 3.5mm jack adapter and now I can use a pair of headphones or the excellent Nokia MD-8 in the jack to hear noise-free perfect Amiga sound at a good volume level instead of the too quiet level of other solutions. I decided against making another hole in the chassi and solder 5V in place of the 3 AAA batteries. They last WELL over a weekend of music-playing, so rechargable batteries are a decent compromise.
Plus it means I don't have to open the case ever again. Which is a powerful argument :D
There's only a few photos - tomorrow I'll clean up this lovely computer, "color in" the holes I've drilled in the paint job, and put vinyl stickers to make the UK keyboard a US keyboard, and protect the screen with an iPad screen protector I bought.
Then it's ready for action :) and heavy-duty coding on parties - see you at Datastorm 2011!
UPDATE:
OK, cleaned up the beast and finished it off. Added some pictures, use the Next link above the pics to see them all.
Tried the "Clear/mirror" iPad screen cover, but it destroyed the LCD's awesome viewing angle and made the colors look like one of those mirages you can angle a bit and the motif changes. It changed the hues to give them a cyan/magenty/yellow tint. Instead I put two pads on the top of the screen that will make sure no keys will touch the screen. The reason for the scratchings that are already there came very early in the build process and has nothing to do with the keyboard, just "mechanical handling" when messing with the hinge. But now I can make sure nothing else happens to it, and it's nothing you see while using it, you have to look at it from the side while shining a flashlight on it. It looks beautiful :)
It now has sound! I guess I could have put the RCA to stereo adapter cable inside, and even put the speakers inside. But now the speakers aren't muffled by the case, and it's all plug and play so I can fit it in whatever bags I choose for the demoparty trip and select what to bring. The speakers now sit centered behind the screen (where they should be!), and I soldered 5V power to them and won't have to buy batteries ever again! It sounds medium-loud, no strange bass-boosting or treble-piercing, and quite nice :)
I tested the "DF1 as DF0" jumper of the ACA630, and it boots nicely from disk. Perhaps I'll paint the steel cover of the external drive with the same black.
Made the keyboard proper US layout (well... :) ) instead of UK, with nice vinyl stickers that will stay on forever and never get dirty or yellow.
It could all have been done nicer, if DC-DC converters and other stuff would have been nice to me and I'd have had a lot more time, and wanted to drill lots more holes in the case. But now it's properized and usable. Yeah!


Comment this post